How To Setup Custom Domain For Blogger
 This tutorial will teach you how to setup custom blog domain. If you have purchased the domain from godaddy.com then this tutorial will be really helpful for you. However, if you purchased from some other registrar, you can follow the same steps there too. The setting up custom domain is little complex but yes very easy process if you follow the instructions properly. I have seen lots of people facing problem over this thing and complaining at google product forum, that they tried everything but still they are not able to setup custom domain for their blog. Now just follow the steps, you can setup the custom domain for your blog very easily.
Just log in to your godaddy account and go to my account option.

Go for launch option.

There you can see your domain which you want to use with you blog account. Just click on that.

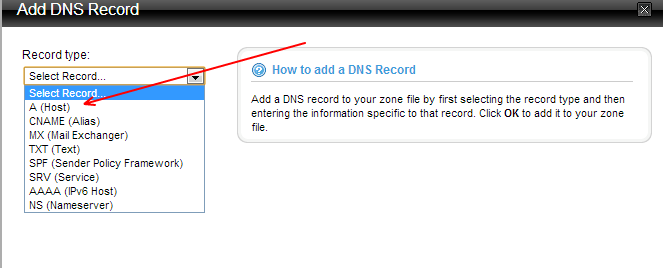
Now, in new window you will get the option of DNS Manager, just click on launch.

There at top of A host, you can see the option of add record, just click on that.

Now, in new window select the option of A record.
Now, you have to put host name @ and 1 custom IP, which is static for all blogs hosted by blogger. The blogger provides you 5 IPs (Common for all blogs) which you have to put in your A host record. Just follow the same process 5 times and you will get the output like this. 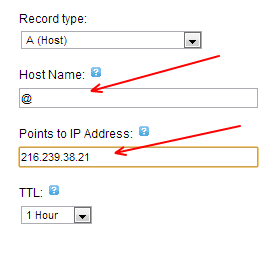

Now, you have to add alias name. Go to the option of record and select alias name.

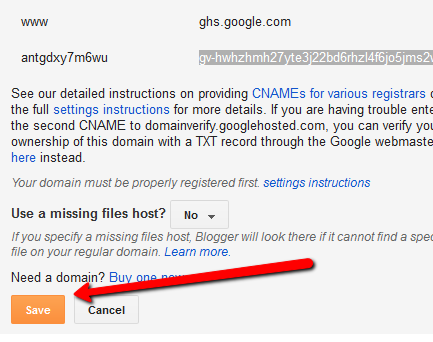
Put alias name www and host name ghs.google.com. Just save everything. Now, log in to your blogger account. Go to settings option, there you will get option for add custom domain. Just switch to advance settings

Just enter your custom domain there and hit save, you will get the window like this.

Google will ask you to verify that you owned that domain. You just need to copy the second one, the name and destination field. Because we have already done with the first one. Just go to your godaddy account and click on add record, select alias and put the code which you got from google and hit ok.

Now, go to your blogger account and hit save again.
Congratulations, now your blog will be having a custom domain. The steps are easy, not much complicated if you follow them properly.

